How to orientate models in SLS 3D printing?
Two main factors of successful SLS 3D printing are controlled heat distribution and proper positioning of models — the first one results from over ten years of experience and refining printers by Sinterit engineers. The second one is largely dependent on the knowledge of the person who uses the printer daily. Since 2014 we have been sharing tips, and showing you how to position your models to get the best results. This article sums up this knowledge but also goes one step further. Today we are going to show you more detailed rules depending on a goal you would like to achieve with your part.
The SLS 3D printing is one of the most precise, sharp, high-quality additive manufacturing technologies. Nevertheless, the process is highly dependent on gravity and heat which is a typical characteristic of 3D printing in general. Luckily, selective laser sintering copes with gravity problems better than other, most popular rapid prototyping technologies.
You don’t need to print supporting structures, as the unsintered powder provides sufficient support. But still, your model is printed layer by layer, and even with almost isotropic properties of SLS, printouts will be stronger in one and weaker in another direction. Precise elements will be sharper in one axis while smoothed in another. Objects with a large area need to be wisely positioned to prevent significant energy accumulation which could lead to warping.
Is there one perfect model orientation?
It is a question that is often asked, but the honest answer is: no, there is no perfect model orientation. To achieve the best possible result in one area of our interest we need to sacrifice the other. This is a common feature of all 3D printing techniques. Instead of looking for the Holy Grail, we suggest following the process which will guarantee the best possible option for your model and application.
The first step – find key characteristics
For each model, indicate the most important feature, like the sharpness of the edge, or smoothness of some part, or other detail that must be perfectly printed. If there is more than one indicator, rank them according to importance. The detailed positioning rules presented below are often exclusive, which is why prioritization is so important.
The second step – choose the most important characteristics
This step is important because as a result you will choose a specific method for positioning the model. It is the phase in which you should rotate your model according to the rules mentioned below. When each of the models you would like to print during the next print job is rotated, you can go to the next step.
The third step – positioning the models in a printing bed
In this step, your goal is to fill the printing area with your models. You need to remember the rules such as accumulating energy at the top and placing the elements as evenly as possible.
The principle of even distribution of models is especially important when the models are quite homogeneous and it is easy for you to pack them in a uniform way. If the models are very different, the smallest ones should be at the bottom of the workspace and the largest ones at the top. You don’t want to have a large volume model at the bottom because it will emit its energy during printing and affect the others.
Now, let’s have a look at the best positioning techniques depending on the effect we want to achieve. Below the banner you will find more than 9 practical tips.
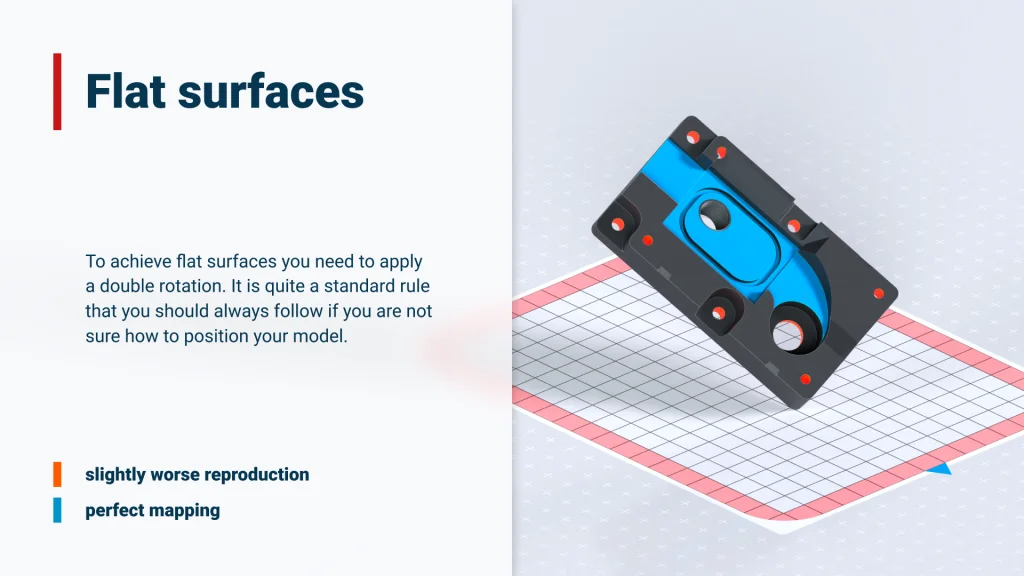
1 Flat surfaces
To achieve flat surfaces you need to apply a double rotation. It is quite a standard rule that you should always follow if you are not sure how to position your model. By rotating the model 45 degrees on one axis and then 45 degrees on the other axis, you achieve the most optimal arrangement for SLS technology.
It is especially crucial when you print large, flat objects and would like to prevent them from bending. It is also the optimal orientation to print parts that must be compatible with others. As you can see in the illustration below, the areas marked in blue will be most perfectly reproduced.
The red color indicates the area that could be less precise but in this example, it is not a problem, because these are mounting holes that can be aligned in post-processing, e.g. by drilling. Please remember those two colors and their meaning (blue – perfect mapping, red – slightly worse reproduction).
2 Roundness/centricity of holes
Let’s reverse the situation for a moment. Sometimes you will need the holes to be perfectly printed. This is especially important if a given hole is intended for a specific screw or nut. You can see this example in the images below.
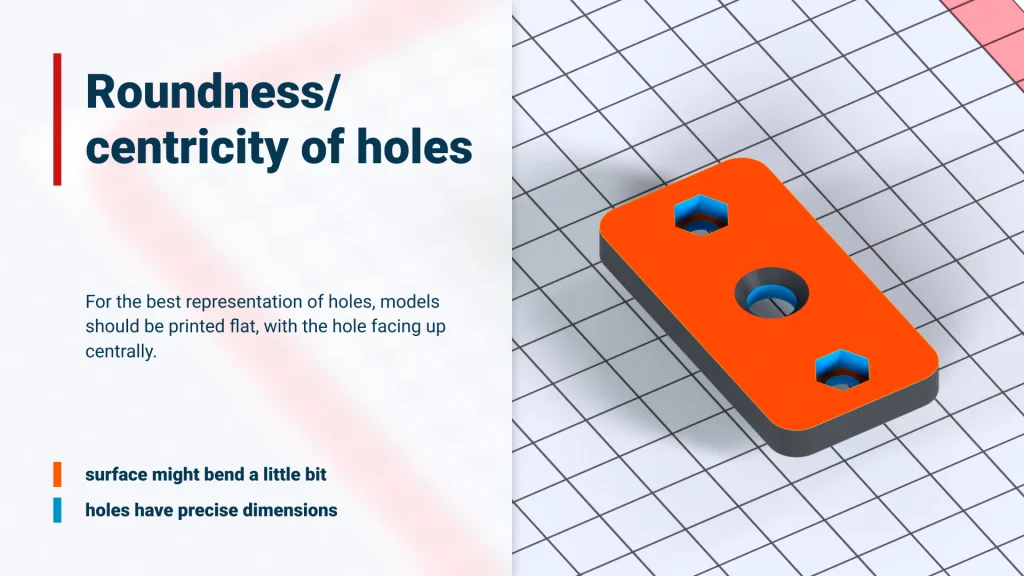
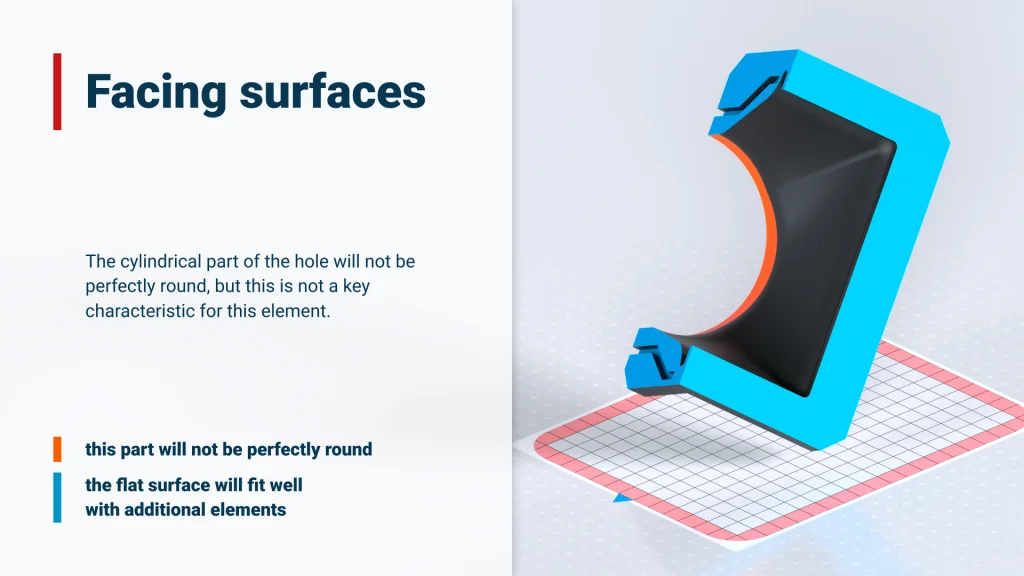
In the first scenario, the flat surface will be a little bend but it will not be a problem because this model will be screwed together with another model, which will make it straighten up.
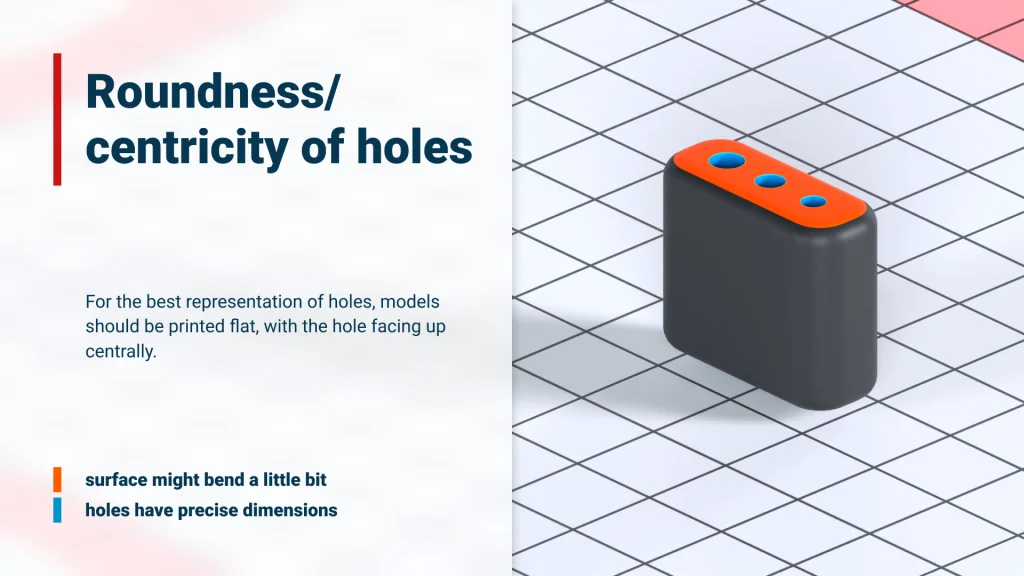
The second scenario will work even better because the model itself is quite high so it will not bend as much and holes will be perfectly mapped.
As you probably guessed, for the best representation of holes, models should be printed flat, with the hole facing up centrally. The surface of the model itself may bend, but this is not always a problem.
3 Dimensions of a specific surface
Now you know, or at least guess that in SLS 3D printing technology, the best mapping is always in the XY axis. Every time you aim for the perfect dimension, position your model flat, with the side that should hold dimension oriented upwards. In other words, a circular element along the Z-axis.

The blue line on the image above shows this perfect mapping of the model edge. Its dimensions will be exactly as you planned, accurate to tenths of a millimeter. The red zone could bend a little, upwards, but in this case, it will not affect the operation of the object.
Use no rotation in the XY-axis, keep the key elements flat.
4 Mechanical strength of a specific element of a part
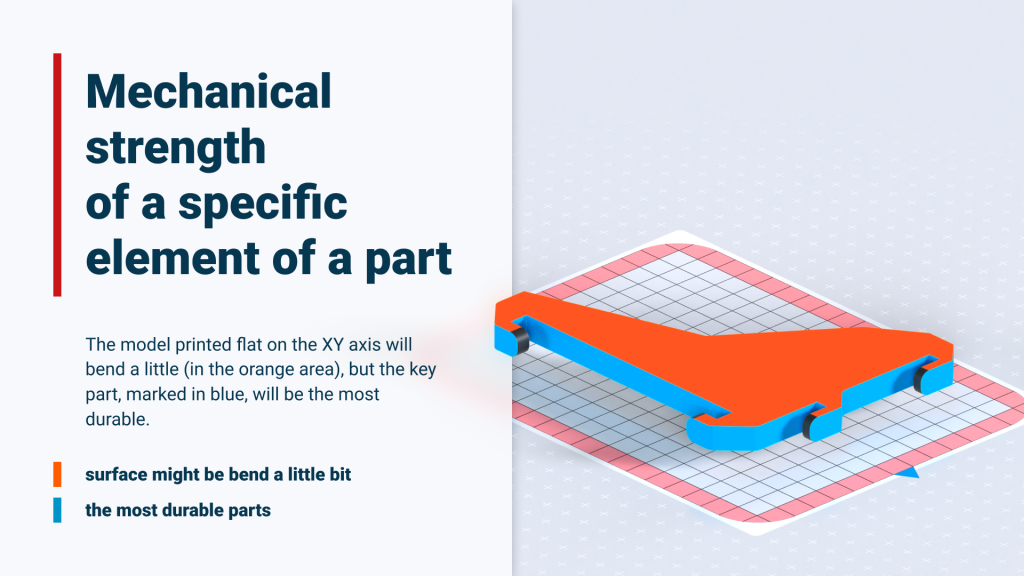
Let’s imagine a model that needs to be especially strong in some parts. This is especially important for all types of handles and hooks, which must be strong in the axes where they are subjected to the greatest force.
The element you can see in the image below is a perfect representation of such a situation.
What we have here is a construction with hooks that have to be strong enough to withstand heavy loads. The model printed flat on the XY axis will bend a little (in the red area), but the key part, marked in blue, will be the most durable.
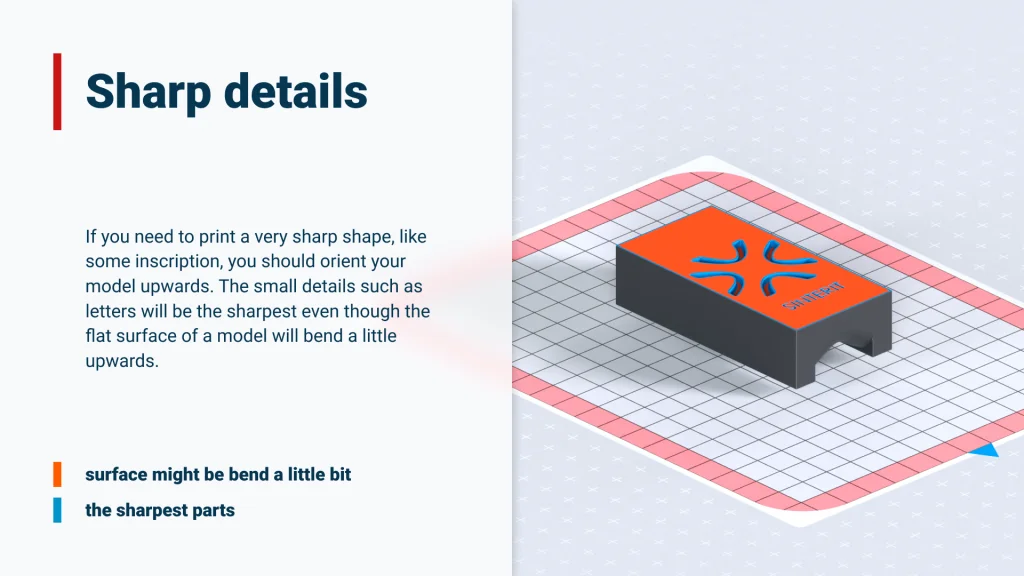
5 Sharp details
If you need to print a very sharp shape, like some inscription, you should orient your model upwards. The small details such as letters will be the sharpest even though the flat surface of a model will bend a little upwards.
6 Rounded/smooth surfaces
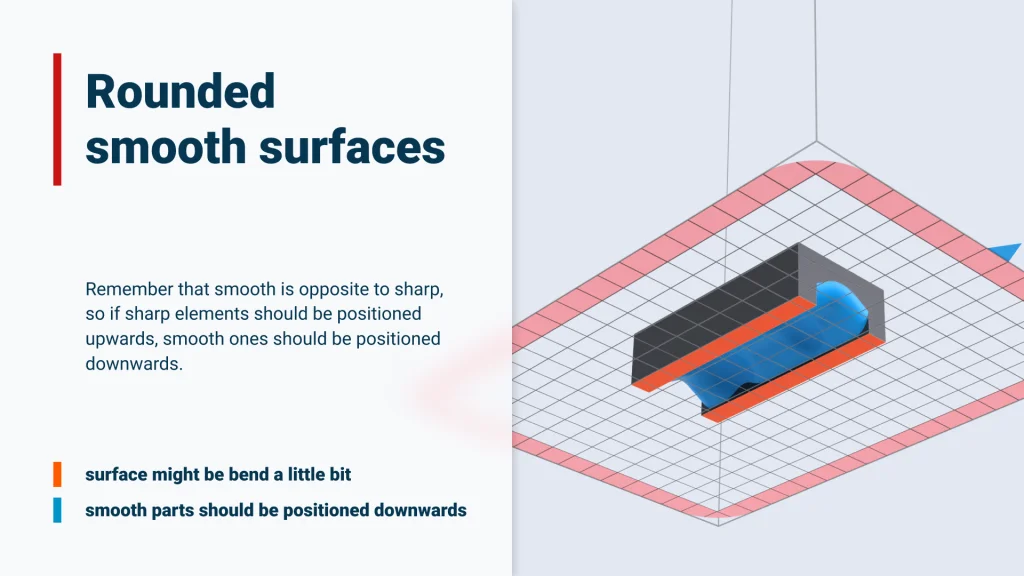
On the other side, we have a situation when you need to achieve rounded, smooth surfaces. The model you can see below is a little more complicated. The designer’s goal was to achieve the smoothest shape of the part highlighted in blue. To make the layers nicely poured, and smooth without visible layer connections, the model should be positioned downwards.
Remember that smooth is opposite to sharp, so if sharp elements should be positioned upwards, smooth ones should be positioned downwards.
7 Facing surfaces
The issue of matching surfaces was described a little in the first rule. Let’s dig into it.
In this model, we highlighted in blue the surface that needs to match with another model. As you can see, it is twisted according to the 45/45 degree rule, but one more thing is important. The facing surface should face upwards (not in the XY axis but rather upwards then downwards). As you know from other rules described before, parts facing upwards are more sharp than those facing downwards.
8 Moving elements
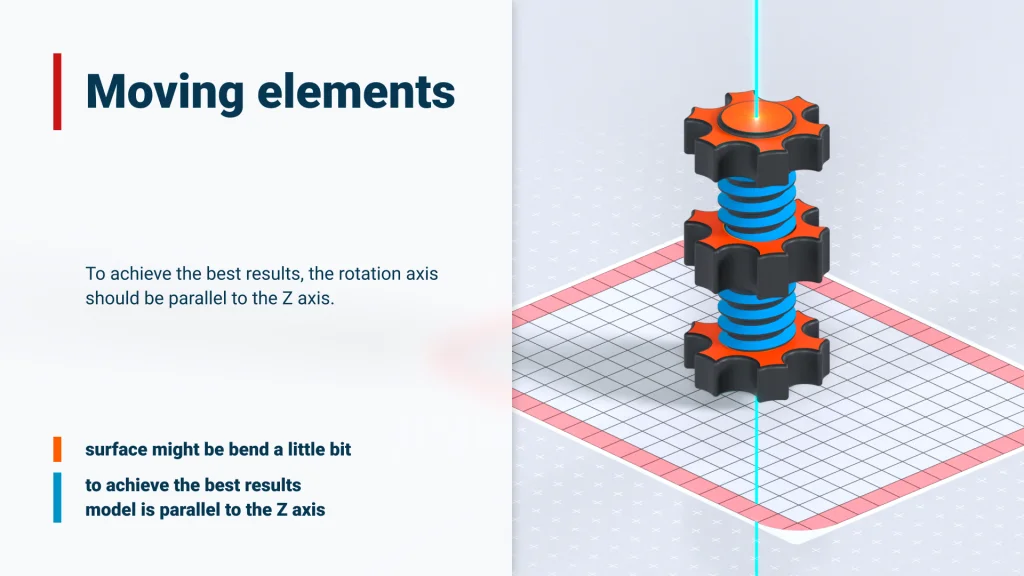
The SLS 3D printing technology does great in printing moving parts. To achieve the best results, the rotation axis should be parallel to the Z axis. Flat surfaces may be slightly bent, but in the case of thicker elements such as a nut, this will not affect the functionality of the print.
9 Small elements, sensitive to damage
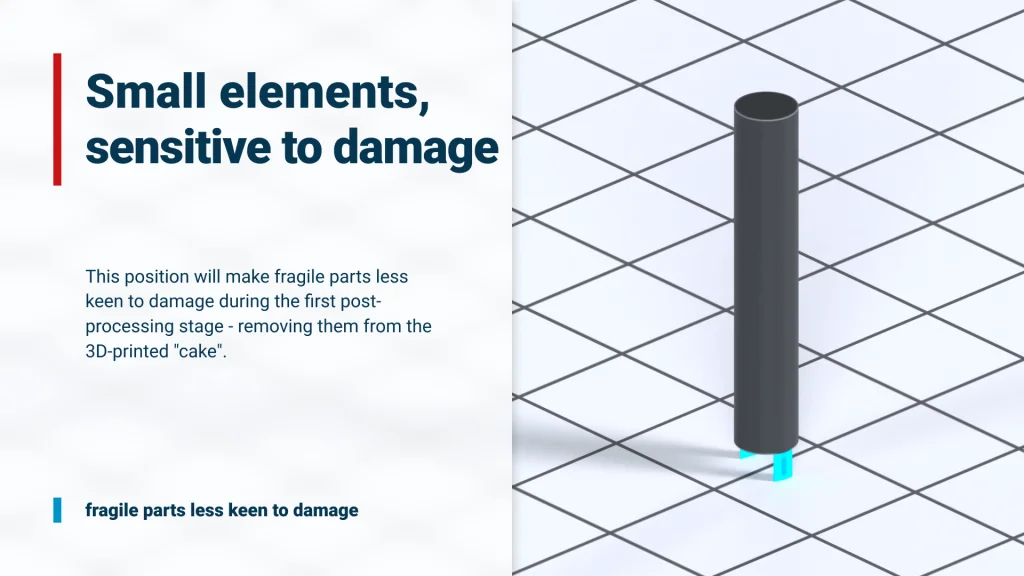
Printing small, fragile elements needs a little compromise. Our experience shows that they should be positioned downwards. After printing, these parts will be slightly more poured than those at the top of the model but they will also be more resistant. This position will make fragile parts less keen to damage during the first post-processing stage – removing them from the 3D-printed “cake”.
Additional rules of model positioning in SLS 3D printing
The nine principles mentioned above were created in response to specific design needs. But there are some general rules you need to know when planning your SLS 3D printing session.
Energy Deployment
SLS 3D printing takes place in a closed, controlled environment where proper energy distribution is crucial. The unsintered powder is heated to a temperature just below the melting point of the material. There are heaters around the bed placed for this purpose. The role of the laser is to add an additional amount of energy needed to melt the powder into the desired shape.
As you probably know, Sinterit printers are capable of printing from different materials with different melting points, so it is important to choose the right powder when preparing a printout in Sinterit Studio software. The printer will act accordingly.
To achieve better results just keep in mind to:
- Place the first element in the middle of the XY layer and on the bottom of it.
- If you print a lot of elements in one go, try to keep them around the middle of the Z axis, preferably in the form of an inverted pyramid – lest elements beard the bottom of the bed, and more elements in the upper part of it. It is plain physics, the heat will go upwards so cumulate the energy in the top of the bed.
- Taking into account the issue of energy accumulation and heat loss upwards, you must remember not to confine energy in the model. If you are printing an object resembling a tank, try to arrange it so that the opening is facing upwards. Excess energy will be able to escape freely. Bypass this rule only if some details of your part are more important than possible bending.
- Remember that the flat surface or curvature with a large radius placed in the printing bed at a small angle will have visible layers.
- If you don’t know which rule to follow, keep the golden rule of 45/45 degree rotation. It is especially recommended if you deal with two contradictory characteristics and can’t choose which one is more important. The “45/45 degree rule” is a compromise.
- Try not to print flat surfaces upright and close to the red zone.
Model modifications
We have referred to physics several times in this article. Its principles are very important in 3D printing and should be remembered. I think it is obvious to you that, for example, a radiator consists of a finned structure that allows heat to be dissipated.
Let’s take this to the field of 3D printing. If you need to print a large, flat part that for some reason needs to be printed parallel to the XY axis, consider adding ribs to the bottom of the model, as we showed in the image below.
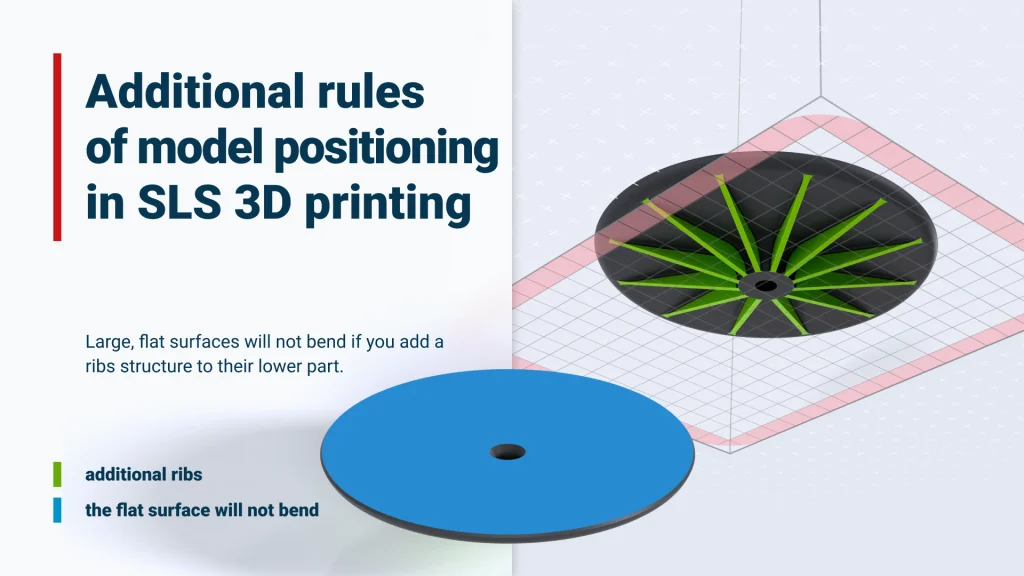
The heat will be distributed evenly and the part will not bend even though it is printed flat.
Another way to prevent models from bending is to make them hollow. It is another benefit of SLS 3D printing technology. Hollow models are still quite strong, but much lighter. It will print perfectly with unsintered powder inside that could be simply removed after printing.
Sometimes, especially if you have a big element to fit into the printing bed and its size is too big to arrange the best possible way, you should rotate it twice by 45 degrees. It may affect the flatness of the surfaces a little bit or the strength of the thinner parts, however, the changes will not affect the model to such an extent that it will not meet its intended purpose. Let’s call it the golden mean.

Summary
SLS 3D printing technology gives you a lot of freedom and very few limitations, unlike other additive manufacturing techniques. If you follow the rules mentioned in this article it will become easier to achieve your goals. Fewer errors, better printouts, and more functional parts are at your fingertips. Remember that you can always ask our experts to help you position the model to achieve the best possible results.