 Austria
  Bosnia and Herzegovina
  Bulgaria
  Croatia
  Czech Republic
  Denmark
  Estonia
  Finland
  France
  Germany
  Greece
  Hungary
  Ireland
  Italy
Italy  Latvia
  Lithuania
  Poland
  Portugal
  Romania
  Slovakia
  Slovenia
  Spain
Spain  Sweden
  Switzerland
  United Kingdom
  Ukraine
  China
China  Hong Kong
  India
India  Israel
  Japan
Japan  Malaysia
  Philippines
  Saudi Arabia
  South Korea
  Taiwan
  Thailand
  Turkey
  United Arab Emirates
  Egypt
Egypt  South Africa
  Tunisia
  Canada
  Mexico
  United States
  Brasil
  Colombia
  Australia
  New Zealand
 Post-processing in 3D printing – how do SLS, SLA and FDM compare?
Among many differences between FDM,SLA and SLS, there’s one that concerns all 3d printing post-processing. It needs to be applied after you take your part out of any printer because there’s always something that needs to be done. Let’s take a closer look at what actions need to be taken in case of each technology, and how time-consuming these processes are.
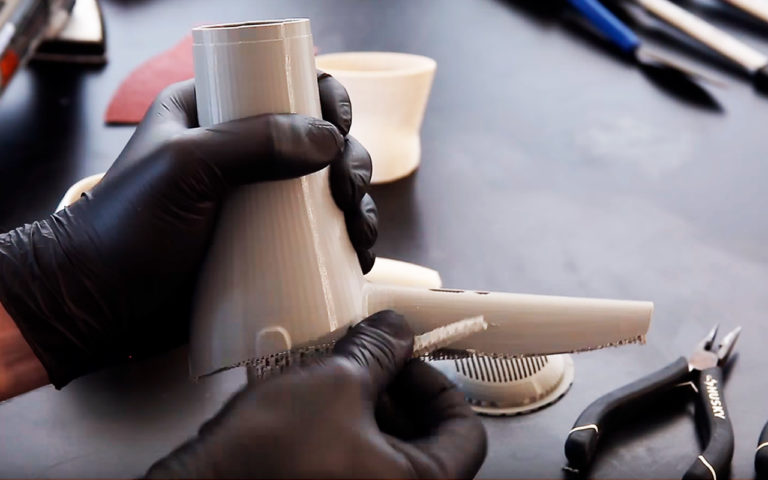
FDM – Fused Deposition Modeling
Several things need to be done after printing something with an FDM printer. First of all, it is crucial to remove the support structures. There are various ways to do that. The most common is manual removal with the use of popular tools you can find in any workshop. It can be relatively fast, depending on the complexity of the object, however, also inaccurate. This method does not remove layer lines, striations, or blemishes. It can also leave marks, diminishing the overall accuracy and appearance of the print. That way important details can be removed by mistake, especially the long and thin ones.
You can also opt to use dissolvable supports from PVA (soluble in water), HIPS (soluble in d-limonene), or other materials. These, however, come with their own set of pitfalls. Improper dissolving can irrevocably damage the print or leave holes that will later need to be refilled. It should also be noted, that in case you’re using desktop printers, it can be quite a lengthy procedure. The process of dissolution of PVA in water, or HIPS in d-limonene is quite slow. Moreover, specialized equipment, such as glass containers or even an ultrasonic bath may be needed.
Finally, solutions resulting from the dissolution of support structures in the FDM 3d printing post-processing are subject to special disposal regulations. Usually, they can not be simply poured into the sink. On the other hand, some filaments (like basic ABS) simply could not stick to PVA, which means sometimes you just can’t use it.

3D Printing Post-Processing: sanding, vapor smoothing and dipping
After the removal of the support structures, the steps that need to be taken can differ. If there are gaps in the print, they’ll need to be filled with epoxy resin, autobody filler, or an ABS and acetone compound. Usually, the surfaces also need to be polished. It can be done manually, with rotary power tools, or with the use of additional techniques such as sanding.
Sanding, in particular, produces smooth surfaces but isn’t recommended for prints with two or fewer perimeter shells, or ones with small, intricate details. If done too aggressively, can impact the accuracy of the part. However, when it goes to power tools, caution is advised since too much friction force produces heat that can melt your print.
Other 3d printing post-processing techniques you can consider include vapor smoothing and dipping. Vapor smoothing can smooth out blemishes and diminish layer lines, but it negatively affects tolerances and strength, due to the “dissolving” of the outer shell and alterations in the material’s properties.
On the other hand, dipping, for example in acetone works very quickly, but the smoothing is very strong, so tolerances are heavily affected. Also, the chemical reaction during this process is powerful and often breaks ABS prints. A day or two later you may notice multiple small cracks on the surface. In many cases, the print also needs to be glued or welded together from separate parts, which is usually quite noticeable and affects the visual aspect of the model.
After that, the only thing left is priming and painting, or coating the print in different kinds of materials, for example, epoxy, or metal – and voila, your work is done.

SLA – Stereolithography
These procedures are time-consuming and require laboratory conditions. Solutions resulting from the dissolution of resins usually have to be disposed of by storing them in special containers and handing them to appropriate services.
Like in the FDM printer’s case, parts made in an SLA printer have to have their supports removed before any other actions can be taken. In addition, after the printing process, the models have to be cleaned of residual resin in aqueous solutions with various types of chemical additives. Also, it is necessary to harden them through the curing process.
3D Printing Post-Processing: polishing and sanding
SLA post-processing can be done manually or by power tools, but other methods can be used in addition (or instead) to produce better results. For example, sanding or polishing can result in getting a smoother surface or better yet – wet sanding – to achieve the perfect smoothness. It is important to mention that both methods can impact the accuracy of the print. In case of sanding or polishing adding some extra material to the print (around 0,1 mm) can help with this issue. When it goes to wet sanding, lower accuracy on the supported side and also possibly some lighter spots here and there due to the use of water are to be expected.
Finishing the print with mineral oil is also a possibility. It is similar to wet sanding, with the added benefit of an oily layer, that helps to hide the typical discoloration. It also lubricates the surface and reduces friction. The downside is that it makes it hard to paint over such a surface.
And since we’ve already mentioned painting – it’s often the next, logical step. Spray-painting the printed part not only helps to conceal the obvious layer lines (especially if it wasn’t sanded or otherwise polished to absolute smoothness) but also protects your work from too severe UV exposure, preventing yellowing and post curing.

SLS – Selective Laser Sintering
The main difference between the SLS 3d post-processing technique in comparison to the previously mentioned ones is that it takes a little more time to set up the print. However, you can save yourself a lot of trouble later on. One of the reasons is that to achieve maximum cost and time efficiency, you need to print many parts at once. It’s best to fill the powder chamber to maximum capacity, and that has to be planned ahead of time. The placement must be right, so that dimensional accuracy isn’t negatively affected.
The machine has to be heated up beforehand and cooled afterward. The good thing is that – once it’s started printing – an SLS printer is completely autonomous and doesn’t require any kind of supervision. Another boon is that you can print complex structures without the need to assemble them from different pieces.
The clean up
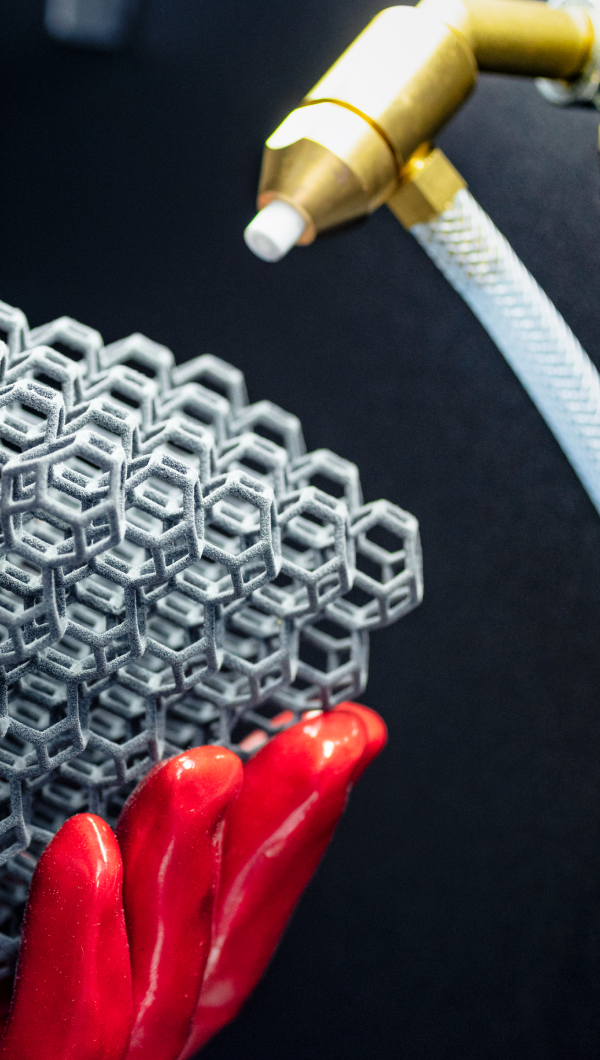
Cleaning up unsintered powder is the first step in the post-processing of an SLS-printed item. This is usually done with compressed air, or it can also be done manually with the help of rice or copper fiber brushes.
While not especially complicated, the process can get messy. Manual post-processing can also result in the unnecessary loss of printing powder. Retrieving unsintered powder is instrumental in reducing your cost per print.
Special equipment that makes post-processing easier, quicker, and more cost-effective is also available. The Sinterit Powder Handling Station reduces the user’s contact with the powder while also recovering of up to 95% of it making the process cost-effective and user-friendly. The PHS can also be connected to the sandblasting machine and vacuum cleaner, so the entire process can be done in one place.
3D Printing Post-Processing: polishing structures
Coming straight out of the printer, the parts have a powdery, grainy finish. Therefore depending on their intended use, some work may have to be done on the surface to achieve optimal results. You can use sanding. Luckily, no specialized equipment is needed – in most cases sandpaper, a precision knife and some pliers are quite enough, but if you like, you can also use an electric sander.
If your print isn’t too delicate and doesn’t need sharp edges, you can opt for Vibro polish, which provides excellent smoothness and can be done on many items at once. Another great way to finish work on a print is sand-blasting – it creates a homogeneous, evenly abraded, and matte surface that scatters light evenly.
After that you can dye your parts and/or apply a different kind of coating to make them more durable or watertight and that’s it – the print is done.
Which technology is better?
There’s no question: SLS holds the advantage. Readying the printer for work and dusting off the spare powder after it’s done requires nowhere near as much time and effort as the careful removal of support structures, filling of possible gaps, gluing/welding stuff together, and all other things that are often needed just to make a part usable. The SLS technique also produces the most accurate and complete print currently possible, right off the bat, and supports printing of multiple parts at once. Whether you need many simple items, or a smaller number of very complex ones – SLS remains a better choice.
The lack of support structures and the fact that there’s no need to put parts together after getting them out of the printer are the deciding factors here. All the other 3d printing post-processing actions such as polishing, painting, sand-blasting, vapor smoothing, coating them with different substances, etc. can be done regardless of the printing method used and can therefore be described as finishing touches.
They may, or may not be needed, depending on the situation, as not every printed part needs to be smooth, painted, or coated with something, to be usable. Every single one, however, needs to be whole and to accurately represent the intended design – which, in the case of FDM and SLA printing methods, requires additional post-processing work.


 Costs of investment


