Waiting for the delivery – what to prepare before the SLS printer installation?
The excitement is real – after months of research, meetings, and approvals, your new SLS 3D printer is finally on its way. Imagine that you just received confirmation that the crate would arrive within days. As someone responsible not only for accepting the delivery but also for setting up and getting the machine operational, you found yourself sitting in your workspace, looking around and asking: What do I need to prepare to ensure everything goes smoothly?
Is the floor strong enough? Is there enough ventilation? Do I have the right tools, safety gear, and software ready? The questions started piling up faster than you expected, and you realized that thorough preparation would be just as important as the installation itself.
That’s why we decided to write this article: to help you, whether you’re a lab manager, engineer, technician, or business owner, make the most of the days leading up to your SLS printer’s arrival. With the right steps, you’ll avoid unnecessary delays, reduce stress, and get to printing faster.
Understanding the rules – how to prepare the physical space for 3D printing
Before your printer arrives, it’s crucial to familiarize yourself with its technical and environmental requirements. This means understanding factors like power supply specifications, ventilation needs, acceptable temperature and humidity ranges, and necessary safety clearances.
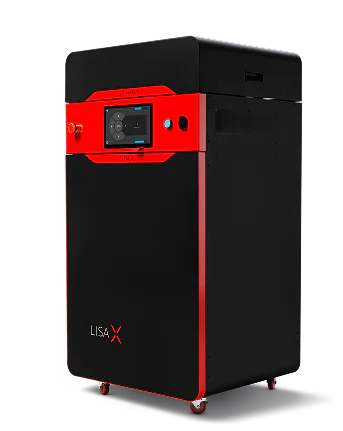
When Lisa X or Suzy printer gets to work, it needs a comfy, well-prepared home. Start with solid flooring – smooth, hard, level, and anti-static. It also needs peace and quiet, so keep it far away from any heavy, vibrating machines like industrial presses. Make sure you’ve got enough elbow room too: at least 9 m² of floor space, 2.4 m ceiling height, and doorways no narrower than 0.9 m, so the equipment can actually make it into the room. And once it’s in, don’t shove it in a corner; give it at least 50 cm (20 inches) of breathing room on all sides.
Electrically speaking, you’ll need two standard outlets (230 V or 110 V with a converter), single-phase at 50/60 Hz, protected by a B16 A fuse, and a 30 mA RCD – plus, make sure your grounding system is solid. And just a heads-up: don’t share the line with other motorized devices – this machine isn’t a fan of electrical roommates, even if they make great espresso.
For air and ventilation, your sandblaster SLS will need compressed air (from a central system or compressor), and some materials require inert gas, supplied via a generator or centralized source (don’t worry, there’s a whole article on that, which ones exactly) — CLICK.
Good ventilation is a must; aim for at least four full air changes per hour. Just don’t set it up under an AC vent or next to a frequently opened door unless you want your prints catching a chill. Finally, keep the environment friendly: store everything between 5–40°C, operate in the sweet spot of 16–25°C (ideally 22°C), and maintain humidity at 40–60%, non-condensing.
When planning your workspace, don’t forget about ergonomics – placing the printer and equipment at a comfortable height can reduce strain on the team and improve workplace efficiency. Keeping the area tidy, minimizing unnecessary movement, and ensuring proper organization helps prevent potential accidents.
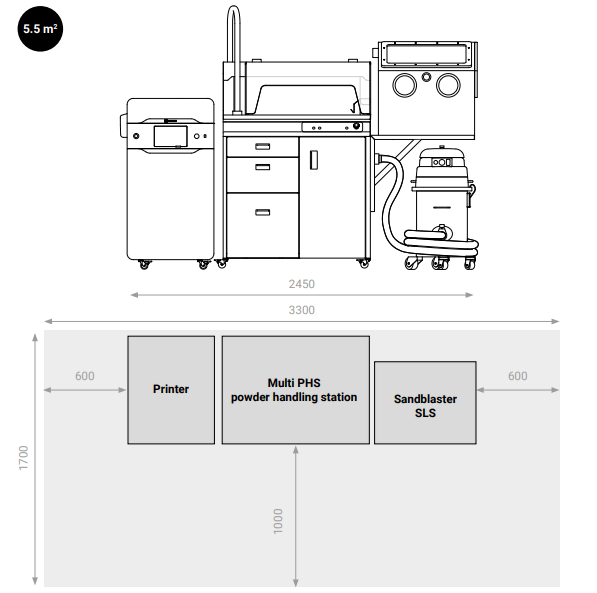
Picture 1 : Minimum space required for a compact series setup
Above, you can find an example arrangement of the equipment; however, there are more of them. More arrangements you can find in the Facility Preparation Guide document (CLICK FOR DOWNLOAD).
Logistics: delivery and unpacking
Before your system arrives, it’s important to plan ahead for the delivery process. From coordinating with your logistics team to making sure the right equipment is available, a little planning goes a long way.
Make sure to touch base with your logistics team and the delivery company ahead of time; depending on the size of your printer, you might need a forklift, pallet jack, or even a crane to get it in safely. It’s a good idea to have someone on-site who knows what to expect and can check for any damage, go through the packing list, and take a few photos during unpacking, just in case you need them for support later on.
Unloading and moving in your Sinterit system isn’t overly complicated, but it does require a bit of planning. At a minimum, you’ll need doors at least 90 cm wide and about 3 m² of clear space to work with. If your workspace is on an upper floor, make sure a lift is available. To move the entire delivery at once, a forklift is highly recommended. Having two people on hand will make the process much smoother and safer. You’ll also want a few basic tools ready: a utility knife, a Phillips screwdriver, protective gloves, a tape measure, and – if you’re setting up the Sandblaster SLS – access to an air compressor.
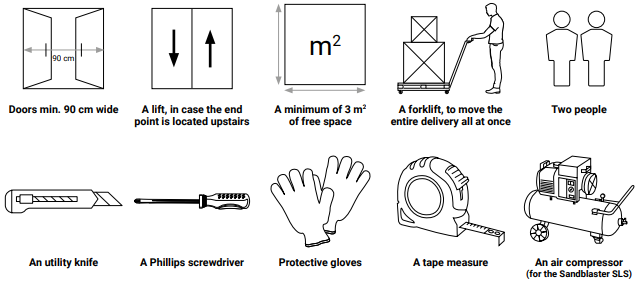
Picture2 : Items required when receiving LisaX / Suzy delivery
FAQ
What should I prepare before my SLS 3D printer delivery?
Ensure that there’s a clear, accessible path to the installation site with wide enough doorways. Prepare enough free space to safely unload and assemble the equipment. If the printer is heavy, arrange tools to unload it.
Will I need special equipment to unload the Sinterit Lisa X printer?
Not necessarily, but some planning is needed. Unloading isn’t overly complicated, but depending on your location, you may need a forklift or pallet jack, especially if you want to move the entire delivery at once.
Is ventilation important when setting up an SLS printer?
Yes, proper ventilation is crucial. SLS printers generate fine powder and particles during printing and post-processing. You’ll need at least four full air changes per hour in the room, and the setup should avoid placing the printer near AC vents or doors to maintain stable conditions and avoid powder dispersion.
Learn more about safety, software, and training before you start printing with a SLS 3D printer.